Showing posts with label DIY. Show all posts

Thursday, August 29, 2013

No-Poo Adventures Episode 2: Conditioner-Only Washing


2 months or so ago I posted about the apple cider vinegar rinse.  I now know that the rinse did what it was supposed to, but the immediate effect of it made me panic. For any of you out there that use a daily routine of smoothing cream, no-frizz products, flat ironing and so on, letting your hair air dry and sit naturally is a very difficult concept to grasp. I spent some more time in my nopoo community, and decided to ease into it a lot more slowly. My hair is fine, and prone to breakage, so going from and over-processed routine to NoPoo straight away was a bad idea for me.

Conditioner-only washing is exactly how it sounds. You use conditioner only to wash your hair in order to keep the oils in your locks that shampoo would have stripped them of completely. It is recommended to switch to a natural conditioner, at least with no silicones in it. I decided to use my own conditioner first, for two reasons: It's a huge bottle and I want to use it up, and this transition needs to be as gradual as humanly possible for my hair.

I've been using Wella for color-treated hair, and here is my 6 week process.


The beginning! My routine:
Shampoo and Condition with color-safe products
Apply Got2b smooth operator to towel-dried hair
Blow-dry with round brush
Flat Iron
Hair Spray
Daily.


This is a freshly finished, morning look of my old routine. It was after this trip to Cologne that I decided to start gradually moving in to conditioner-only washing. I'll be honest, transitioning at the beginning sucks. Like, really sucks. My hair didn't react too badly but it was a greasefest. I think it was harder for me mentally than my hair physically though, the idea of not using my flat iron was sacrilege.
I started with washing every day, but only with shampoo ever two days. Then, water only every day, and conditioner every other day.Once I successfully adjusted to washing every two days, I stopped using products and head tools completely. About 10 days of air-drying and no-styling, washing ever two days, I could start washing with conditioner only once a week.


This was taken after a conditioner wash, after going 7 days with using water only to rinse my hair in the shower.


3 weeks of conditioner-only. This was taken last week, 2 days after a wash. I find that my hair looks best 2 or 3 days after a wash.


Same day, different lighting.


This morning. 4 weeks of conditioner only. 5 weeks since I used any product. 6 weeks since I stopped using my flat iron and hair dryer.

It's early.

My routine now is simple, I wash with conditioner once a week, wrap my hair in an old t-shirt for about 25 minutes, or simply leave the house with my hair wet. Something I was never confident enough to do before. I used to obsess about my hair looking okay and being sprayed and molded perfectly for me to be comfortable with it, but not anymore. It's liberating, actually. I am planning to learn how to use products to style my hair again once I have fully transitioned to no-poo, and no-poo for me means, whatever method of no-poo works best for my hair. This could be:

Shampoo bars
Baking soda to wash and ACV to rinse method.
Silicone, Paraben, and SLS-free Conditioner-Only washing
Lemon juice and white vinegar method
Water-only.

The full transition will take some time for me, but I think next week I will give baking soda and ACV method a shot.


Sunday, May 26, 2013

DIY Whipped Shea Body Butter

In the midst of my first Apple Cider Vinegar adventure which will be another week or so there are a couple other things I wanted to try, one of which is whipped shea butter.

I. Love. Lotions. I love to make things for my skin, I love to  make things that smell delicious and feel delicious and make my skin feel softer than a newborn baby's fragile fetus skin. I recently discovered that using coconut oil on my face makes me break out, and then I discovered that it's actually really common for that to happen because coconut oil is very comedogenic. Don't worry, I too had never heard that word before in my life. This blog spellchecker is giving me the red squiggly under comedogenic, but it's damn wrong. Spellchecker needs to go back to school.

Comedogenic basically means, "a tendency to create acne." Oils and products that are comedogenic clog pores, and create breakouts. So while coconut oil can be used for tons of different things including moisturizing the skin, it should not be used on the face and if it is, should be wiped off afterwards like if you are using it as a makeup remover, which I recommend.

Shea butter is another wonder product, and I know that most women have heard it before because it shows up in various products for hair or skin that are super-moisturizing and usually very thick and rich in texture. The problem with store bought mixtures is you can't control what other chemicals go into the butter, which doesn't sit well with me because my skin is extremely reactive and I get to learn about new allergies all the time.

What is Shea butter? It's fat sucked out of the African Shea Tree. Thanks wikipedia. Obviously, since it's a type of fat, it is  beneficial for skin and hair, you can even eat it. I'm not going to eat it, I'm going to slather it all over my face.

Steps to whipping Shea butter:

First, decide what type of texture you want. If you want a creamy lotion-like texture, you are going to need liquid oils to add to to the mixture. I didn't have much on hand so I settled for having a slightly harder texture to my finished product. The less liquid oil, (olive, almond, avocado, whatever) the harder the texture. The ratio should be about a quarter liquid oils to whatever else you have in the mixture.

My ingredients:
Teaspoon Vitamin E oil
Half cup of shea butter
Quarter cup of coconut oil
Vanilla Essential Oil


1. First attempt

Melt the shea butter in a double boiler or a makeshift one like mine, which is a pot with a pyrex baking dish on top. Just make sure that there is room for steam to escape.


When the butter is melted, allow it to cool entirely before adding your carrier oils, if any. I did not do this at first, I added a ton of essential oil but could not smell it whatsoever and I think it's because I did not wait for the oil to cool. Should take about 30 minutes and no longer feel hot to the touch.


After you've added the oils, pop the mix into the freezer for about 20 minutes until the edges start to harden and turn white. The centre may be runny.

Then throw that shit in a mixer and start whipping.


I was amazed, success! The mixture will continue to harden a bit however after you've mixed, moreso if you use less liquid oils or none.


While it technically worked, this was too hard of a texture for me, i wanted to make a more lotion-like mixture. I scooped our about 80% of it and went to re-melt it, keeping a small amount to use for my face since my second attempt, I'd be adding coconut oil. This mixture feels amazing on my face, and has officially replaced my piss-cream.

2. Attempt two

Original mix with coconut oil on top. This time I waited until the oil was cooled until I added the vanilla, and I added a shit ton of it, like 200 hundred drops, and it's a very subtle vanilla scent.


Creamy like pancake batter, oh yeah.

I adore shea butter, and I'll be experimenting with more mixtures in the future for sure and making more of my own body butters.


Sunday, May 19, 2013

Lace details on jean shorts, sneaky DIY leg alteration

Summer is upon me and my fellow south-germans, and I can tell because we get 1 clear, sunny day per week midst a blanket of wet, cloudy weather with a hint of thunderstorms. Add this to an average of 90% humidity, and the traditional wind-less atmosphere of the valley in which Baden-Wurttemburg sits, surrounded by a thick, dense forest. Every morning I bike to work in sunshine, sometimes for the second day in a row, which brings me a glimmer of hope. Will we have sun and warmth all this week? Could it be? Consistent sunshine? Only to return home sticky and stuffy 9 hours later, dreams of non-bipolar weather crushed. During the day I gaze out of my office window staring longingly into the tiny patch of blue sky that moves further and further towards Switzerland, bringing a familiar and inevitable haze of disappointment among me, and leaving me to the black and white water color painting that I live in. Those sunny Swiss bastards. Ah, summer.

One thing that is okay about this weather is that its definitely not cold anymore, which is why I start to sweat just looking at all the O-burg civilians still dressed in wool coats and scarves. Even though the hot weather is not consistent, it still exists, and though i never now when, because god forbid the forecast be accurate, I still decided to be prepared, and this meant shorts shopping.

My weight really tends to fluctuate and yet, along with my purse strings, my patience does not. I have shopping for pants, and shorts, because the only places I can really shop around here are giant chain stores like H&M that make clothing for mannequins, and children. I'm not going to gripe about their sizes too much, dresses and shirts I never really have much problems with, it's just pants, but it doesn't help that bottom fashion seem to not have any flexibility in structure. So while their sizes might range from a 00 to a 14, they still only fit one body type in each size.

My problem? The part of my thighs just under my ass are wider than my hips, and then the rest of my thighs below the thickest part are slimmer. What the fuck, nature.
Whenever I shop for pants I either get a giant gaping slack fabric above my ass that I could use as a basket for groceries or I get the 'sausage link' effect on my thighs, where they are so tight that they either A: make my leg look like a tube of toothpaste with an elastic band around it or B: ride up into my crotch and under my buttcheeks, never to be seen again.

I always have to take dress pants to tailors to get them altered, and I know that regular shorts just don't fit me properly so I first thought of finding some old mom jeans at the thrift store and cutting them into shorts. Perfect right? High waisted is in, they'd be 'vintage' or whatever, totally cute. Pinterest had me so damn confident, it looked so simple, so I ventured off to the second hand store on my lunch break.

How in the fuck did adult women find jeans that fit before stretch denim was invented, oh my fucking god.

 So LITERALLY 19 pairs of jeans later, I give up, I'm discouraged. Maybe it's because of the selection in my one trusty second hand store, and maybe I could have found some in Value Village back home, but for now I'm discouraged, and I look at the 'easy mom-jean DIY' pin with anger and dispair.

When it got hot again and I was stuck with pants, I started looking for other options for shorts, again on Pinterest. Like a boyfriend I think has changed, I keep going back to you Pinterest. While I was skimming pinterest for DIY projects I stumbled across the lace-detail technique, where you rip the seam on the size of the shorts and extend the width of the leg, covering the cut with lace. It was so simple, how could I not have thought that? This time I'm wary, I have to leave this up to my own imagination so I can make it work this time, because GOD it's hot.

I go to H&M, find some cheap shorts that fit around my ass and are cutting off the circulation in my legs, perfect. I grin wildly at my un-proportioned legs, suffocating in these jokes of size 10's, you think you're so fucking perfect don't you shorts, it's my fault that I can't fit in you isn't it? I should be discouraged and hit the gym more shouldn't I? WELL NOT TODAY.
After that I go to Karstadt (German version of Hudson's Bay Company) to find some lace. So I go to the giant fabric selection looking for sheets of lace or crochet type things, can't find any. I ask the lady if there are any sheets of lace or lace-type things, of course there aren't any, because that's the only thing I actually need and there are 7000 types of fabric in this section. There's even sheets of fucking latex. Are you kidding me Karstadt? So I leave with a seam ripper and some white thread which I needed also, and head to the thrift store. My husband thinks I won't find any lace there, no, but I know for a fact I'll find old doilies and tableclothy things that could work. He's skeptical, but I assure him that there is some kind of unwritten rule that a thrift store can't open unless it has a surplus of doilies. When we get there, I'm right. I stock up on doilies.

Step By Step


The specimen


The cut. I actually had a pair of skinny jeans on and put the jeans on while I was wearing them to judge the cut, so that regardless of if I made a mistake or not there'd be extra wiggle room. I cut these a few times before I settled on a 16 cm extension. The cut itself is not that wide, but when I put the shorts on with the cut made, the amount the bottom points of the triangle stretch equals to about 16 inches, which is how far apart each ends of the lace should be to fit comfortable. 


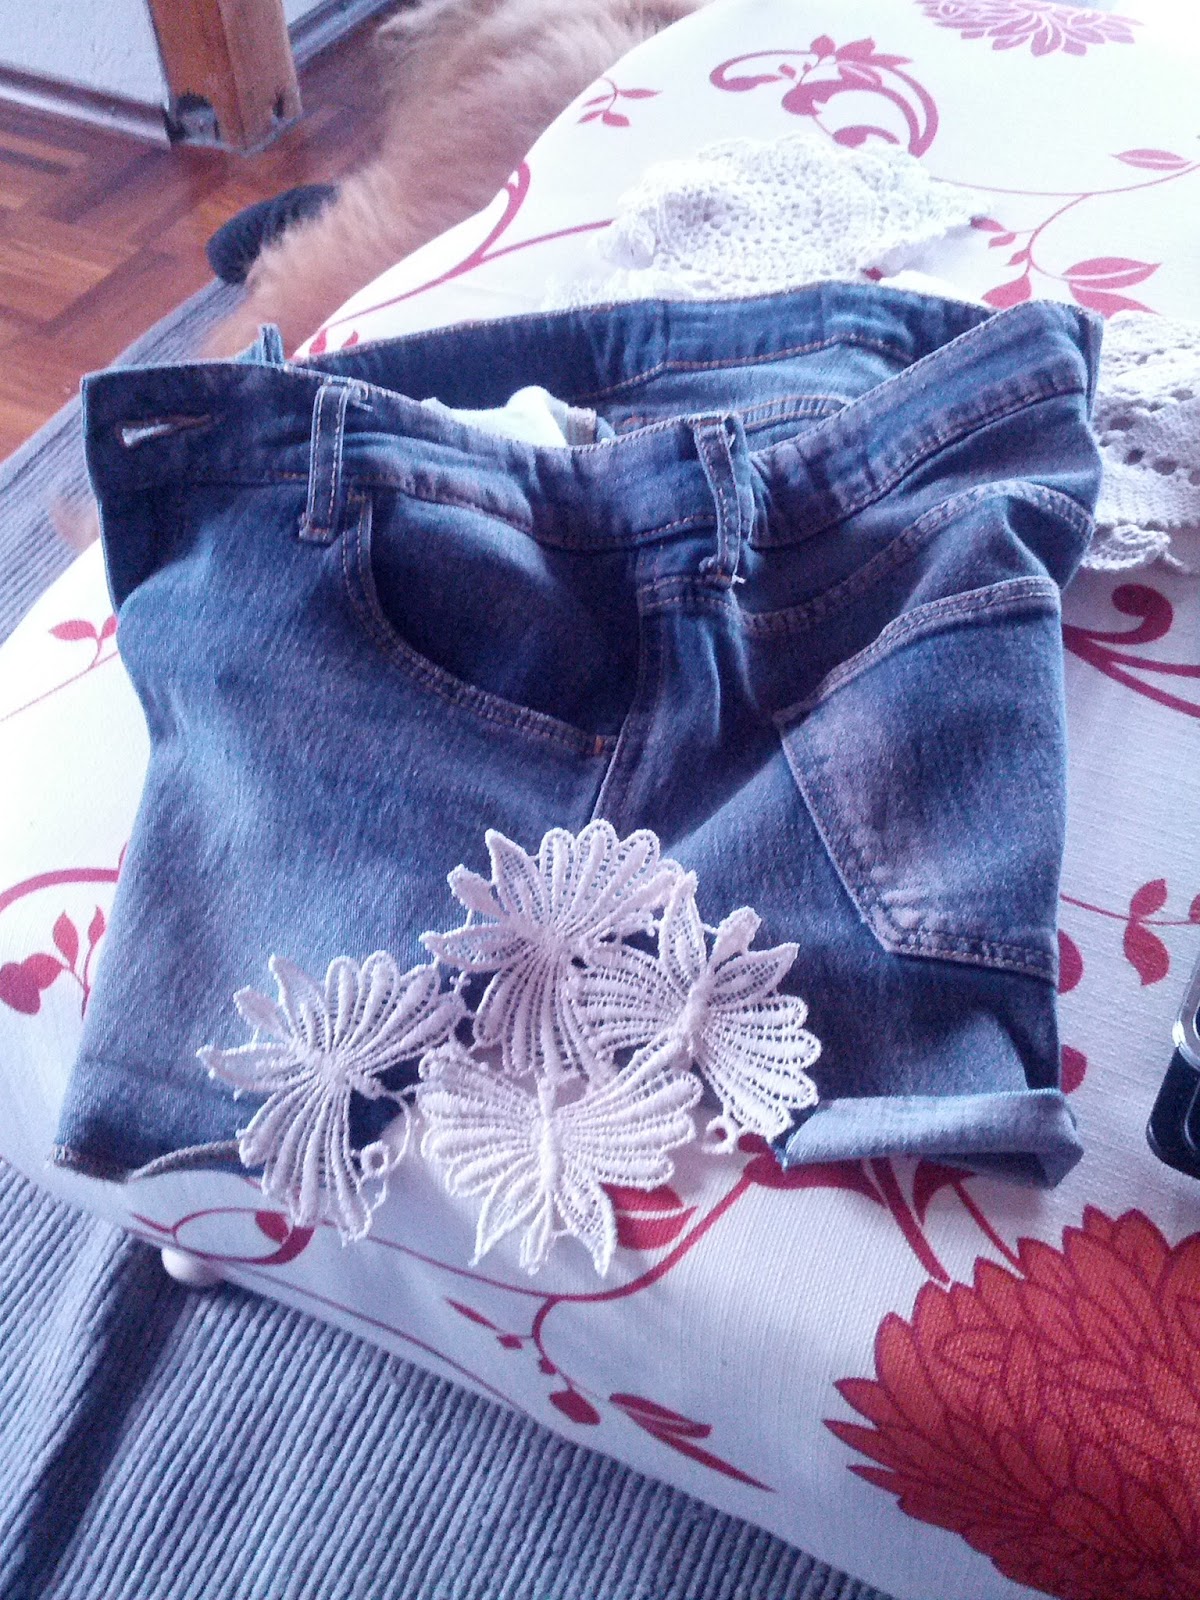
The details. Butterfly doily is the cutest and most efficient. I am going to be sewing this bitch by hand so it won't look perfect, so having a perfect triangle of fabric will end up looking messier when the inevitable happens.

Pin the lace over the cut as desired.


Closer look. Then start sewing.


At the one hour mark I am naturally, interrupted by a cat, cue break time.


The finished result. I added more lace to the front of the shorts because it looked a little weird with it just on the sides, and I added a bit of another doily on the hip. Also, now I want a sewing machine more than ever. This whole think took about 4 hours to complete, and now I have leather fingertips.


I can't believe how well it turned out, actually. The shorts are really comfy now and they sit on my legs where I like them to sit. Added tip: When doing this, having shorts that were pre-rolled helped a lot. When I ripped the seam I actually only sewed the fold on the front, and ironed the fold on the back and left it alone. That way, the back of the shorts actually stretch lower than the front, so they don't ride up and disappear.


Monday, March 25, 2013

German Hardware Stores: Ottoman DIY


I've wanted to do crafts with pallets for a long time, because I see them all over pinterest and a craft that saves me money on furniture is always well loved by me and my family. So of course, as I'm flipping through pinterest I find a couple that seem really, really simple to do, and I get excited. I find this post  by Kim O'donnell and I think to myself, "that looks easy, and awesome, I need to do this, suddenly I am very aware that I am lacking an ottoman  therefore I must construct one!" So in all my excitement and motivation I make a list of things that I need to make this thing, and get ready to head to my favorite store, Obi.

The things I need:

1 pallet
2 metres of foam
3 metres of fabric
staple gun
legs

Easy right?

Let me tell you something about German hardware stores. 

 Back in Canada, what do you do when you need a pallet?  You go to Rona or Walmart, or a back fucking alley and just pick one up that isn't being used. What do you do when you need spare parts or scratch fabric? Value Village. And foam squares? Walmart, a couple bucks for a square foot of foam and maybe 20 bucks for one of those giant mattress foamies. My DIY project? Probably about 50 Euros I guess, judging by normal prices I was used to. ROOKIE FOREIGNER MISTAKE. Why I ever thought that I could have the AUDACITY to assume that craft supplies and home reno supplies would be the same price in every single country is beyond me, but I assumed, and it bit me in the ass. So off I go to Obi to ask for some pallets. 20 euros a pop. Then I go wander around to the discount hardware store, they don't sell foam, or furniture feet or fabric. Back to Obi, because there are no second hand stores in Offenburg that sell anything besides clothing. I wander upstairs, spot the foam, scamper off towards it ready to finish my purchases to read the 30 EURO PER METER PRICE TAG. What. I don't even. WHAT. Little did I know that foam sheets were a precious material in this country/region/town WHATEVER. So by now I have to buy it otherwise everything else I bought for this project was a waste, and I build my damn ottoman. It looks mashed together and it cost me 100 godamn euros to make but I use it every single day because fuck german hardware stores .

Anyway, I was stupid to make such a bold assumption but at least in the end I made my ottomon, and I like it, even though its lumpy and kind of weird looking, I think it's beautiful and I will take it with me wherever I may move to within the European union, because shipping this monstrous beast would be impossible. Join me in my ottomon-building journey.


Here is my precious damn foam


Cat is just obviously helping.


So I layed the fabric, then the layer of batting, then the foam down on the ground. I layed the pallet on top of the foam, made sure it was all lined up and cut to size, then went to work.

First stapling the batting around the foam and into the pallet


I started with the sides, tipping the pallet over on one side to pull the fabric extra tight in order to finish stapling.


Wrapped the fabric around the pallet like a present

As tight as possible


DON'T staple the fabric this far in! You'll read why in a second...

Insert 2 week wait period. I couldn't for the life of me find furniture legs that were not 10 euros EACH anywhere around here, so I ordered some then had to wait.  I didn't photograph the leg-drilling process but for the love of god make sure there is no fabric where you are drilling the legs in, just bare wood. After i covered the entire pallet in fabric I realized I was an idiot and had to rip it all back off in order to make room for the legs, it was a pain in the ass, but it turned out okay in the end.


Voila, I love my ottoman. You can see some weird wrinkles in the fabric but I don't care. It's sturdy and bright and I love it. But it's really just an oversized cat bed.


Saturday, February 16, 2013

Exfoliating Scrub Recipes - Holy shit, coconut oil

Exfoliating Scrub Recipes, adding Rosemary to my skincare arsenal and:
 Holy shit, coconut oil. Why you never have to buy a scrub from a drugstore ever again.
February 16th, 2013

(Skip to the pictures for the recipes, y'lazy goob)

It's the weekend, so obviously after my morning volunteer run-through at the Offenburg Animal Shelter (Tierheim, german word for the day. Tiergarten is zoo. Tier means animal. You got it. ) I get home, super lively at around 2pm, buzzing to do something crafty. Since Saturday is the country-wide errand-running day because there apparently is no German word for 'convenience', grocery shopping is done, then I get going on household tasks such as laundry, cleaning up my room and doing some weekly cat-grooming, which lately, translates into digging into my older cat's ears that are so gross with ear-mite dust I finish looking like a coal miner. If you have animals, and they ever get ear mites, just prepare to go spelunking in their ears for about a month-long cycle of medication. Wear goggles.

So I'm done all my buzzing around with chores and I start to browse pinterest, and I find all these cool fancy recipes for at-home exfoliants. This was on my list of things to try for a while, and since my coconut oil finally arrived in the mail (cause' amazon is the answer to giving up search for products/food items in Germany) I jumped at the chance to try it.

Now sure, lots of recipes call for special ingredients, like that damn raw honey I keep seeing everywhere. Sorry pinterest, I don't want to buy a 50ml pot of your damn raw honey for 30 euros. NOPE. Same goes for finding fresh herbs  and using sea salt, or sugar in the raw. These aren't hard to find, nor very expensive, but really? Do I specifically need sea salt? I don't have any of these in the house, and I wasn't about to go out again on a second grocery trip, so fuck it.


Why fancy scrubs are horse shit

If you want to buy lots of fancy scrubs because you dig the smell, you collect them, you just love em' for whatever reason and don't care about what they have in them or what they do, then awesome. There are tons of awesome-smelling, beneficial and great products out there, but as my skin is angry and reactive, so am I, reactive to the cosmetic industry taking my money and playing me like a FIDDLE. Over the last few months of my skin-care voyage I have noted the golden household ingredients for healthy, soft, 'glowing' skin. Despite the use of many adjectives such as glowing, radiant, perfect, luscious  for what you skin should be, and many more adjectives of what the products actually do such as, rejuvenate  refresh, cleanse, fortify, nourish, hydrate, repair, or my personal favorite: invigorate, (I mean what the hell does that even mean? How do you figuratively give strength and energy to your hair or skin? ) they all basically mean the same thing. In fact, according to the handy google dictionary: Fortify, strengthen, refresh, rejuvenate  nourish, and invigorate, are all synonyms of each other, that mean: "to Give strength or energy to" You think you're so godamn clever don't you P&G. This is what every one of those words mean, no matter what is in the bottle:


Soft 
Even toned in appearance 
Firm
Clean


Overall, these are the trademarks of healthy skin, what millions of people strive for. I'm not a doctor or a skin-expert, but really that's what it comes down to as a person who has contributed a great deal to the multi-billion dollar cosmetic industry, trying to find that miracle product. So when we break it down to find the things that improve the appearance and feel of our skin in the ways that the common consumer is after, I can confidently recommend the following:

Awesome, cheap, easy-to-find, and natural (for my hippy pals) products

Lemons/Lemon Juice - evens skin tone, is an astringent, which means it cleans and disinfects very well
Honey - evens skin tone, corrects scarring/blemishes/impurities, softens, also great for hair growth/softness/damage repair (though the only cure for split ends is to cut them off) and shine, also doubles as a snack when you put it on your face
Coffee Grounds - greatly improves elasticity, evens skin tone, awesome for wrinkles and cellulite (note, there is no 'cure' for cellulite. Sorry ladies, we gotta learn to love our bumps)
Clear Aloe Vera Gel - Awesome for the scalp, hair growth, and mild burns (obvs) always remember your scalp is part of our skin, and needs attention
Coconut oil - Awesome for godamn everything I just listed. Oil should be a base ingredient in everything you make for your skin. 

Disregard following paragraph if you are unwilling to pay more than 5 euros for 25ml of product or go on a prolonged search for specific item that may or may not be possible to find in the entire country of Germany, not even in the damn pharmacy

Additional splurgey skincare item: 
Pure Vitamin E oil - softens, corrects scarring/blemishes/impurities, improves elasticity. It comes in really small quanities and has a consistency like honey, the results are similar but the vitamin E oil provided a much stronger and more noticeable difference in my skin tone. I used it for some chicken pox scars and I use it when my mustache-flare ups die down to help heal the skin, it works really well.

All the listed items above contribute to 3 types of drugstore scrubs:

1. The sexy, soft, silky skin scrub = Firm, even-toned, smooth, calming scents
2. The wake-you-up, refreshing, rejuvenating scrub = firm, even-toned, smooth, stimulating ingredients such as caffeine or citrus
3. The exotic/rare cellulite magic - firm, even-toned, smooth, probably has salt from the dead sea in it.

They all do the same shit, the only real difference in what these items do for you is whether they stimulate your senses or calm you down. I'm not saying that any product is better than the other, nor am I refuting the idea that salt from the dead sea is beneficial to your skin, I'm just saying that if you are like me and stand in the drug store aisle, with "nourishing scrub" in one hand and "invigorating scrub" in the other hand like you are trying to dismantle a bomb, thinking frantically to yourself "well I want to nourish my skin but...if I nourish it how will I invigorate it?!" you don't have to worry, cause they're pretty much all the same, and how each product affects your skin is up to your skin. TL;DR - The cosmetic industry is a thirsty bitch

So I decided to use these ingredients and a few more that I found while browsing through the recipes to make my own exfoliants at home, but before I list them, let me tell you how amazing coconut oil is.

I didn't really expect what I got in the mail, I was thinking it would look like cooking oil but it doesn't, coconut oil actually normally comes in jars because it normally solid. Like if you left bacon grease in a pan overnight (don't ever do that) to dry. It will melt on your skin just by rubbing it in, but if you are using it for your hair, (which you SHOULD) I recommend popping a little bowl of it in the microwave for about 20 seconds. Last night I massaged about 2 tablespoons worth into my scalp and onto the ends of my hair, combed it all through and fell asleep with it in. I woke up, washed my hair as normal, and was delighted to see extremely soft, light, smooth and shiny hair. This alone makes it a keeper for me.It worked wonder on my broken ends, and I couldn't stop running my hands through my hair afterwards.God, it's so good, get some and just slather it all over your body then bask in it on your bed naked like a well-oiled snake. So obviously when I fell in love with how it treated my hair, I needed to try it on my skin. Obviously. Here are two recipes that I made, one is stimulating, the other is calming.

Why exfoliating is good:
1. Improves circulation in skin. Good circulation = less wrinkles, firmer skin, even skin tone
2. Gets rid of dead skin and makes way for new baby smooth skin
3. It feels like naked angels are rubbing you all over with ground up ecstasy

1. Coffee Grounds Scrub
 (If I were selling it retail, I'd probably call it "organic-rejuvenating morning-burst-cellulite-magic" and sell it for 25 euros a jar.)


Don't mind my ultra-ghetto labels.

Don't use this one on your face, it's way too harsh. Unless your face is made by nokia.

1. half a cup of coffee grounds. You can use used or unused, made it with fresh grounds.
2. half a cup of sugar. I used brown sugar because the crystals are larger than white sugar, so they are rougher and soak up more of the oil.
3. half cup of coconut oil
4. quarter cup of olive oil

The result: 
Skin-gasms and insanely soft skin. I presume it is the caffeine making my skin tingle. Seriously, it felt amazing rubbing it on, like a massage. I think that also might be because of how rough the scrub is. I did take a picture of my cellulite-spot, after a week or so I'll see how it effects it, because I think this would be really great to use in the morning to wake up my body. But I won't bother you with my orange-peel bum until after the test.

2. Rosemary, Honey, Ginger, Coconut, Lemon


Pretty much says it right in the title. This one you can use on your face, I didn't try it because my mustache just cleared up and I don't want to risk angering it.

I was experimenting with this one. I wanted to make a scrub more for relaxing, since the coffee scrub was the opposite of calming. So I did some research and found that Rosemary is also a very popular candidate in the at-home beauty-recipe world. There are lots of ways to use it, essential oil, fresh or dried, even ground up. I had some dried at home, which appealed to me because it was already in my house, so I used that. You can grab fresh rosemary and chop it up for this recipe, but you'd be making the extra trip to the store pretty much just for the extra strong scent, and I'd call you a goob. Rosemary as an herb is an astringent, whereas the oil tones and firms skin, improving it's elasticity. Because it is an astringent, it clears excess oil from where it's used, which makes it great for skin/hair, as well as it's disinfecting properties that make it great for treating skin conditions like eczema and acne. It also smells incredible, similar to lavender (I think anyway) and is often used to calm the senses through aromatherapy, despite the fact that it is actually considered a strong stimulant.

So when I decided to use rosemary I added a few ingredients that I thought would go along with it.

1. Half a cup of rosemary
2. 1-1.5 cups of salt
3. half a cup of coconut oil
4. 2 tbsp lemon juice
5. 1 teaspoon ginger
6. 2 teaspoons honey

I added a bit of brown sugar near the end to help soak up some of the excess oil.

The Result:

Smells awesome, my skin is soft, and I am relaxed, but my skin is feeling tingly and clean. It's the kind of refreshing feeling that is good for bed, not quite as stimulating as the coffee recipe. This recipe smells great and I don't have to worry about my skin flaring up since all the ingredients are already compatible with my skin, which makes it go great with a calming bubble bath.  I added the ginger because of how much I liked it when added to my detox bath last week, it proved beneficial yet again and added to the scent. The rosemary seems to have actually improved my skin tone only slightly with one use, which makes me optimistic, and I'll be adding it to my collection.

I will continue to make scrubs, I think it's really fun experimenting with various ingredients, especially since my first attempts were a success, and I want to see what other kinds of scents and textures I can come up with. I don't think I'll ever buy a scrub from a drugstore again, and neither will you, hopefully after reading this you will realize that you are a strong, independant hairless mammal, who takes care of it's weak outer layer, who don't need no fancy adjectives.

Tuesday, February 5, 2013

I tried knitting

Knitting
February 4th, 2013

Ever since I discovered Etsy I've been getting more and more obsessed with the idea of making my own clothes. Yeah I can express my individuality and no one else would have the same clothes and it would be better for the environment, and little kids in Bangladesh wouldn't be breaking their fingers to sew 'YOLO' into my crew-neck, but what it really comes down to, is that I just want to make really cool shit that makes me look like Ezmerelda for like a fraction of the price of retail. So I can alter my own clothes, so I can make my own pants that might actually fit properly, and so I can look at every single pair of jean shorts I own and just load those fuckers up with lace and change the lining on everything in my wardrobe that has a lining in it.

Before I buy a sewing machine out of the blue and attempt to do this by being instructed by only a youtube video, I thought I would attempt to try something a little simpler and a little more inexpensive, like knitting. Knitting can't be that hard right? Grandmothers do it, I've seen little kids do it, you're just weaving some yarn together, no big deal, I can figure that out. 

Knitting Day 1:
 I wander off to Karstadt, which is the German version of The Bay, and meander around looking for the fabric section, because I don't know what fabric is in German and won't even attempt to look at the directory, which at this point in my move overseas, may as well be written in Klingon. I finally find it, and begin shopping. I pick me out a 'starter' kit suggested by the lady at the counter after I tell her I want to make a sweater, she tells me that might be too difficult at first so I should try a hat or a scarf, I go with her suggestion, I buy the starter kit. Then I head home, with full intention of going home and learning how to knit a sweater, and I feel very smug and rebellious about it. Don't tell ME I can't knit a sweater if I want to!

So I sit down and pull up some pages on how to knit, and discover that they are extremely way out of my league. After a few google searches of "beginner" knitting tutorials, I have discovered that people in the knitting community have no idea what the word "beginner" means. I began to realize that all of the tutorials I was reading were telling me this:

Step 1. Cast on like this: (okay, got it, casting on, totally easy, this is easy! I can DO THIS!)

Step 2. Make a purl stitch, or a garter stich. (Wait, there are different kinds of stiches?)
Purl stitches when completed look like this. (Wait, how do you make them?)
Garter Stitches look like this. (No, stahp, go back!)

Step 3. You've just knit a scarf! (WHAT)

I gave up entirely on picture tutorials, I now know that I need videos to learn anything. It's late and my eyes are tired from staring at the photo tutorials like I'm trying to move the letters around with my mind into a description that would make sense to me, so I go to bed.

Knitting Day 2:

I found a video tutorial online. I watch it several times, over and over, going slowly step by step, moving back and watching the beginning over again. I successfully and fluidly cast-on. I am encouraged.

Then on to knitting. I spend another 5 minutes re-watching the 10 second demonstration of completing one knit, fueled with rage and frustration on why the simple knit is not clicking in my brain, then I successfully make one. SUCCESS. I HAVE KNIT. I continue on, filled with pride and excitement, but still slightly fueled by rage. I will conquer you, knitting. 

I'M DOING IT. It looks wonky and crooked but it's happening!


I think I missed a loop, STILL GOING.


I think I really fucked it up.


Yeah I really did. DON'T CARE MOVING ON.


The fruit of my labor. It's nothing. But it means success. Despite how unbelievably frustrating it was to just get the basic how to knit down, I can now say that I have got the hang of it, and now I'm just practicing how to keep the knits tight and I'm not working on what appears to be a scarf, NOT, a sweater.

4 hours after my initial knit-success, I started over to make my 'scarf.' this piece took about an hour and a half to do, and it ain't lookin' so bad. Oh knitting, you are a cruel yet irresistible mistress.